

Rep5x: Open-Source 5-Axis Printing
Research project developing affordable retrofit systems to add 5-axis capabilities to consumer 3D printers, with complete documentation and community collaboration.
Built on open source foundations


Technical Overview
How Rep5x Works
A retrofit system that adds yaw and pitch rotation to existing 3D printers, letting you print complex shapes without support material.
Retrofit Design
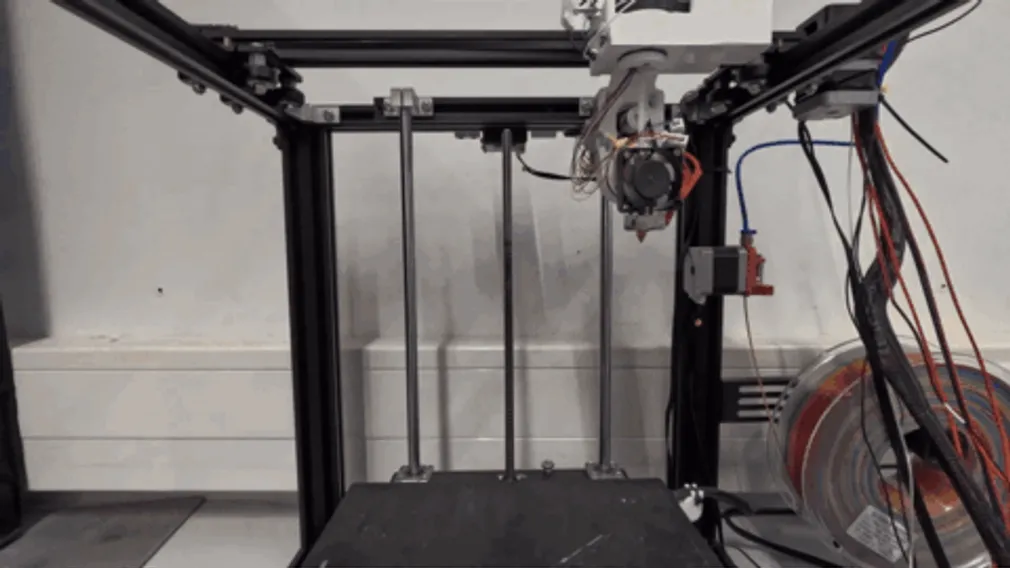
Adds yaw and pitch rotation axes to existing 3D printers with continuous yaw rotation and >90° pitch tilt range.
Reduced Support Requirements
Yaw and pitch rotation allow printing complex geometries support-free, eliminating support structures for many overhangs.
Better Part Strength
Control over layer orientation allows for stronger parts by aligning print layers with load directions and stress patterns.
Material Efficiency
Reduced support material usage decreases waste and post-processing time for suitable part geometries.
Modular Implementation
Currently implemented for Ender 5 Pro and Ender 3 V3 with modular design allowing adaptation to other consumer printer platforms.
Open-Source Development
Complete documentation on GitHub enables community contributions and adaptations to additional printer models.
Blog
Latest Development Updates
Follow the progress of Rep5x development through detailed blog posts covering hardware improvements, calibration methods, and community releases.

Firmware
Firmware-side IK and calibration
Happy 2026! 🎉 It's been a busy start to the year, and I'm excited to share some major updates to the Rep5x project. Firmware-side inverse kinematics Big thanks to @DerAndere for making this happen! He implemented the PENTA_AXIS_HH (head-head) kinematics in his Marlin2ForPipetBot fork, which we've now integrated into the Rep5x Marlin firmware. Previously, inverse kinematics (IK) calculations had to be done in the slicer or post-processing tools. Now, IK runs directly in the Marlin firmware. This means you can send standard 5-axis G-code with tool tip coordinates and the firmware handles all the complex maths to move the axes correctly. Enable it with G43.4 in your start G-code, disable with G49. Why does this matter?Simpler workflow - No need to run G-code through external tools Real-time compensation - The firmware adjusts on the fly Better compatibility - Works with any slicer that can output 5-axis coordinatesFirmware-side calibration correction The calibrator tool now saves calibration data directly to your printer's EEPROM using the new M667 command. This stores Fourier coefficients that compensate for mechanical errors in your C and B axes. Your start G-code now just needs: G49 ; Disable IK during homing M667 S0 ; Disable calibration during homing G28 ; Home all axes ; ... heating, purge line, etc ... G43.4 ; Enable IK M667 S1 ; Enable calibrationAnd at the end: G49 ; Disable IK before homing M667 S0 ; Disable calibration G28 Z ; Home ZThe calibration data persists across reboots, so you only need to calibrate once (or refine it later if needed). New: Firmware Builder tool Building custom Marlin firmware can be intimidating. The new Firmware Builder tool at tools.rep5x.com/firmware-builder makes it simple.Select your control board, enter your printer dimensions, configure your motors, and the tool builds ready-to-flash firmware directly in your browser. No need to install PlatformIO or edit configuration files manually. Currently supports the BTT Octopus V1.1 with more boards coming soon. If you need support for a different board or want additional features, message me on Discord and I can add it straight away. Axis naming: A is now C We've updated the axis naming to follow industry standards. The rotational axis around Z (yaw) is now called C-axis instead of A-axis. This aligns with conventions from ISO 841, the NIST RS274 NGC specification, and LinuxCNC. The convention: positive C is clockwise rotation of the toolhead relative to the workpiece, when viewed from the workpiece looking from -Z towards +Z. In practice, this means:G-code now uses C instead of A for the yaw axis B remains the tilt/pitch axis All tools, firmware, and documentation have been updatedIf you have existing G-code or configurations using A, you'll need to update them to use C. Tool updates All the Rep5x tools have received updates:Calibrator - Now saves calibration to firmware via M667, with support for refining existing calibration LC/LB Measure - Renamed from LA/LB to match the correct axis naming, now saves measurements directly to printer EEPROM instead of browser storage Vase Generator - Simplified by removing client-side calibration (now handled by firmware) G-code Viewer - Updated to work with the new firmware-based IK All tools - Visual refresh with consistent stylingWhat's next I've seen great progress from people building their own Rep5x printers. If you're thinking about building one yourself or are stuck somewhere along the way, reach out on Discord or message me directly. I'm happy to help with CAD modelling, firmware configuration, general troubleshooting, or anything else you might need. For me personally, the focus now is on better documenting the project and continuing to write and test. Specific goals:More control board support in the Firmware Builder Improved documentation for the calibration workflow Hardware adaptation for the Ender 3 ProTry it out All tools are available at tools.rep5x.com. The Firmware Builder is live and ready to use. Questions or feedback? Join our Discord!
Tools
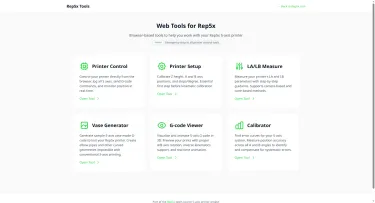
Introducing Rep5x Tools
Rep5x Tools is a collection of browser-based tools to help you set up, calibrate, and use your 5-axis printer. No installation needed, just open your browser and connect to your printer.Available tools Printer Control Control your printer directly from the browser. Jog all 5 axes, send G-code commands, and monitor position in real-time. Press Space for emergency stop.Printer Setup Calibrate Z height, A and B axis positions, and steps/degree. This is the essential first step before kinematic calibration.LA/LB Measure Measure your printer's LA and LB kinematic parameters with step-by-step guidance. Supports both camera-based and cone-based measurement methods.Vase Generator Generate sample 5-axis vase mode G-code to test your printer. Create elbow pipes, mushroom vases, and other curved geometries that are impossible with conventional 3-axis printing.G-code Viewer Visualise and animate 5-axis G-code in 3D. Preview your prints with proper A/B axis rotation, inverse kinematics support, collision detection, and real-time animation.Hardware: Rep5x Camera Some tools work even better with the optional Rep5x Camera module, a simple USB camera with built-in LED lighting that mounts to your printer's bed.The camera enables precise measurements by providing a close-up view of the nozzle. In the LA/LB Measure tool, you align the nozzle tip to a crosshair on screen and confirm the position. Much easier than eyeballing it from the side of your printer. The upcoming Calibrator tool will also use this camera for automated error mapping across all A and B angles. If you don't want to build the camera module, no problem. All tools have alternative methods that work without additional hardware, like the cone-based measurement method already available in LA/LB Measure. Coming soon: Calibrator The Calibrator tool is currently in development. It works like bed leveling mesh but for your rotational axes. Measure position errors across different A and B angles to generate error curves, then run your G-code through the tool to apply compensation. Try it out All tools are available at tools.rep5x.com. Connect to your printer via USB and you're good to go. Questions or feedback? Join our Discord!
Community
New website and assembly instructions
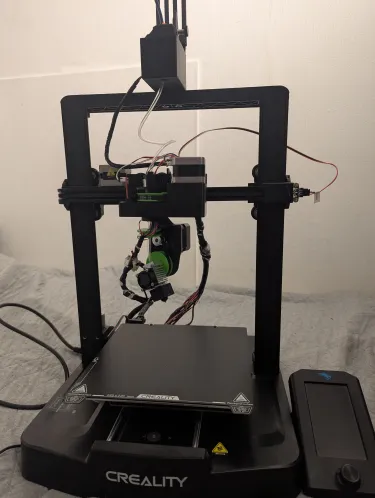
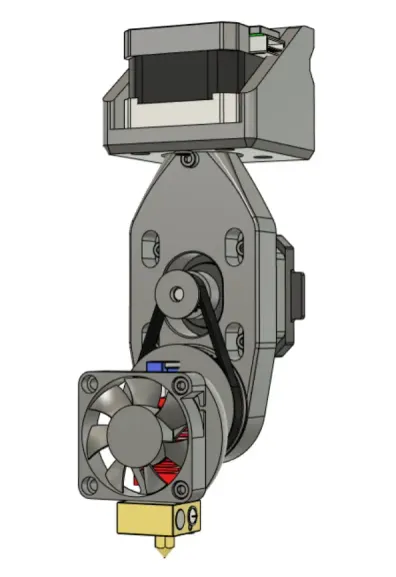
I'm excited to share two updates for the Rep5x project: assembly instructions are now available, and we have a new website to make the project more accessible! Making 5-axis accessible to everyone GitHub remains the heart of the development, all the files, documentation, and collaboration happen there. But after chatting with some people I realised that navigating GitHub can be intimidating if you're not familiar with it. That's why I created Rep5x.com - a friendly front door to the project that won't scare away makers who might be put off by repository structures and markdown instructions. The website offers:An introduction to what Rep5x is and can do The GitHub build guides with visual instructions Direct links to all the resources in our GitHub repository A less technical entry point for those new to open-source projects The same information, just presented in a more familiar web formatAssembly instructions: ready for buildersAn assembled Rep5x printer ready for testing and better cable managementAfter some refining of the build process, I've documented the main steps needed to convert a standard 3D printer into a 5-axis machine. The instructions are now available and tested on real builds. The guide covers:Electronics preparation - Control board setup, firmware flashing, and wiring Component assembly - With photos of each step Printer installation - Mounting the 5-axis system to your existing printerLet's build together I'm looking for makers who want to build a 5-axis printer - I'd love to see your take on it and collaborate to improve the project together. Your build experience will help identify gaps in documentation, pain points in the process, and areas that need refinement.The carriage mount is the foundation of the 5-axis systemIf you're interested in building a 5-axis printer, we can collaborate directly: I'll help with parts sourcing and printer compatibility questions, we'll troubleshoot challenges and document solutions, I'll assist with firmware configuration for your specific setup, together we'll work through calibration and first prints, and your feedback will help adapt the design and instructions. This collaboration benefits everyone, your build helps improve Rep5x for the entire community while you get a working 5-axis printer. Ready to start? The complete assembly instructions are available on our build instructions page and in our GitHub repository, with universal instructions plus guides for specific printer models.Work in progressIf you're interested in building a 5-axis printer or have questions, join our Discord - the fastest way to reach me and other builders. If you're an experienced maker with some 3D printing modification experience, I'd love to see your take on building a 5-axis printer. The website might make it easier to get started, and we can collaborate through the build process. Let's expand what's possible with desktop 3D printing!
Project Features
Rep5x Project Overview
An open-source research project developing affordable 5-axis printing retrofits for consumer 3D printers, enabling new printing capabilities through community collaboration.
5-Axis Motion Control
Implementation
Adding yaw and pitch rotation to standard 3D printers lets you print complex shapes without support material, reducing reliance on support structures.
Coordinated Multi-Axis Movement
Continuous yaw rotation and >90° pitch tilt allow parts to be printed from optimal angles.
Support Structure Reduction
Strategic part orientation can eliminate support material for many complex geometries.
Open-Source Retrofit System Design
Complete documentation and modular design allow adaptation to different printer models, with community contributions driving development forward.
- CAD files and build documentation available on GitHub
- Marlin firmware modifications for 5-axis control
- Currently tested on Ender 5 Pro platform
- Community-driven adaptation to additional printer models


Start Building Your 5-Axis Printer
Join the community developing affordable 5-axis printing solutions.
Access complete documentation, firmware, and collaborate with other builders.